

Part 1- How to Make Prints of Your Artwork: Scanning
Why Make Prints?
You might want to have prints made of your artwork for a few reasons: you may want to sell the original but keep a print for yourself, you may want to make prints to sell, and prints are cheaper which may help you to get more buyers.
My first attempt at having a print made was a selfish one. I drew my grandmother’s cat, Peanut, for my Aunt Susan who took him in after my grandmother was unable to care for him. Anyway, my mom and I thought the picture would look good on my wall in the kitchen, and so I had a print made. Well, it was hideous. I just threw it away.
My second attempt was when a client wanted me to draw a picture of a dearly loved dog and then get prints made of that drawing for her grandchildren. Thankfully, my second attempt was successful. Here’s how I did it.
Step 1: Capture the Artwork
I tried to get around scanning for this step. I had an awesome scanner at the school where I used to work as a computer teacher/science teacher. I figured out that it captured my artwork way better than taking a photograph with my iPhone or my Canon mirrorless camera.
After I quit teaching (I valued my sanity), I tried to educate myself on photographing artwork to see if I could get that to work. No. You will find all kinds of information regarding taking pictures of your artwork like take the picture outside on a cloudy day, or take the picture with multiple lights facing the artwork. None of these things worked for me, and I really tried so that I could avoid buying a scanner.
I think a profressional photographer could take a good picture, but I never looked into that route.
Taking a photograph myself might be good enough for social media shots, but not for having prints made. This was what went wrong with my first attempt. I didn’t have a scanner, so I justpictures of the cat drawing and tried to fix the imbalances of light in Adobe Photoshop, but it didn’t work.
Options for Capturing Artwork
Professional Scanner-
Have a professional scan it for you. If you have someone who do this near where you live, you could try this option.
Professional Photographer-
I know some artists have professional photographers take pictures of their artwork. This can be especially helpful if you have a large piece of artwork or a canvas you want captured.
Buy a scanner-
This is what I did. And after a lot of research, I discovered that the one I had at school was the best scanner for me based on the amount of money I could spend and the quality of the scans it can produce.
Type of Scanner
The Epson V600 is the best scanner according to my tons of research. The scan size is not huge (8.5 x 11.7 inches), but if you have Adobe Photoshop, I will show you how to scan it in pieces and merge them together using the software. It’s magical!
If you are interested in purchasing one I’d appreciate if you use this link: Epson V600 I’m an Amazon Affiliate and I’d get a small amount if you purchase through this link :)
As of May 2023, the price is on sale from to $350 to $330. Sometimes you can get it for $300. And sometimes they are hard to find, like around last Christmas when I was hunting for one.
Epson V600 Scan Settings
I researched how to scan my artwork using the Epson V600 to try and achieve the best quality scan for my prints. I found out that you can scan in super high quality, but the file size will be huge. I’m talking 30 megabytes!
Then I learned that the key is to find the sweet spot. You need to scan the highest quality image possible but at a size that is usable. When I scanned an excellent image of a drawing I created, it was so big I couldn’t work on it without freezing up my computer. No bueno.
The good news is that I figured out how to scan a high enough quality image that would make beautfiul prints, even when my drawing was enlarged in the prints.
Here’s what I did inside the Epson Scan Program. I will tell you what each box means if you are curious. If not, skim the list below for the few settings that I actually changed or watch the video I made. Below is a screen capture so you can see exactly what I’m talking about.

Epson Scan Program
Open up the Epson Scan program. Select “Professional Scan”. This gives you more options than the other modes. Select “Reflective” for “Document Type”. The other option is for film.
Select “Document Table” for “Source”. This is the location where you are scanning your artwork.
Select “Photo” for “Auto Exposure Type”. The other option is document, so you’d use that if you are scanning paperwork, for example.
DPI
Select your dpi- which is short for dots per inch. That’s short for dots per inch. Higher DPI numbers will capture more data and details, but they will also create bigger files. The maximum dpi for this scanner is 6,400, which is not necessary for our purposes.
A resolution of 600 to 1200 DPI is generally suitable for most artwork. You can always scan something and see how big the file size is. If it’s too big (in my opinion above 20 megabytes) delete it and try another scan with a lower DPI.
Something to keep in mind is if you plan to print the scanned image at a larger size, you might want to consider a higher resolution. That way when you blow up your artwork it won’t be blurry.
Image Type
For color artwork, select the "24-bit mode next to “Image Type” to capture the full range of colors.
For a black and white line drawing select “Black and White” mode.
For grayscale artwork, select “8-bit grayscale”. It will capture the variations in tone where as the “Black and White” mode will only capture black or white.
NOTE: For #4-8, I left these boxes all unchecked. If you don’t care what these options do, just leave them unchecked and read on from #9.
Unsharp Mask
This mode will sharpen your image if you want that. You can change the amount that it will be sharpened by selecting “Low, Medium, or High”. I typically leave this unchecked. You can always sharpen or blur your artwork scan in post-processing.
Descreening
We won’t need to use the descreening option, but I thought I’d tell you what it’s for anyway. The descreening feature is designed to reduce or eliminate the moiré patterns that can appear when scanning printed materials such as magazines, newspapers, or other halftone images.
Moiré patterns are unwanted interference patterns that occur when a regular pattern, such as the dots in a printed image, interact with the regular grid of pixels in a scanner or digital image sensor. These patterns can create a distracting and undesirable effect in the scanned image.
Color Restoration
In the scanning software of the Epson V600, the Color Restoration feature is designed to improve and restore the color quality of faded or old photographs during the scanning process. It helps revive the original colors and enhance the overall appearance of the scanned image.
You might want to use this if you are scanning in an old photo for a commission, but you can leave it unchecked for your artwork scan.
Backlight Correction
The Backlight Correction feature is designed to compensate for the exposure imbalance that can occur when scanning backlit or transparent materials, such as slides or film negatives.
Dust Removal
The Dust Remover feature in the Epson V600 scanning software utilizes an algorithm that identifies and analyzes the image for the presence of dust particles or imperfections. It then applies corrective measures to minimize or eliminate these artifacts from the final scanned image.
This feature can help to save time by automatically removing dust and imperfections without the need for manual editing or post-processing. I removed all of my dust manually, but you may want to try this feature and see if it works for you.
Histogram Adjustment, Tone Correction, and Image Adjustment
I don’t mess with any of these adjustments because in the next step I will show you how to use Photoshop to ensure your scan looks like the original artwork. It’s easier to change settings in post-processing, and so that’s the reason why.
File Type
You will see the “File Save Settings” box after you click “Scan”.
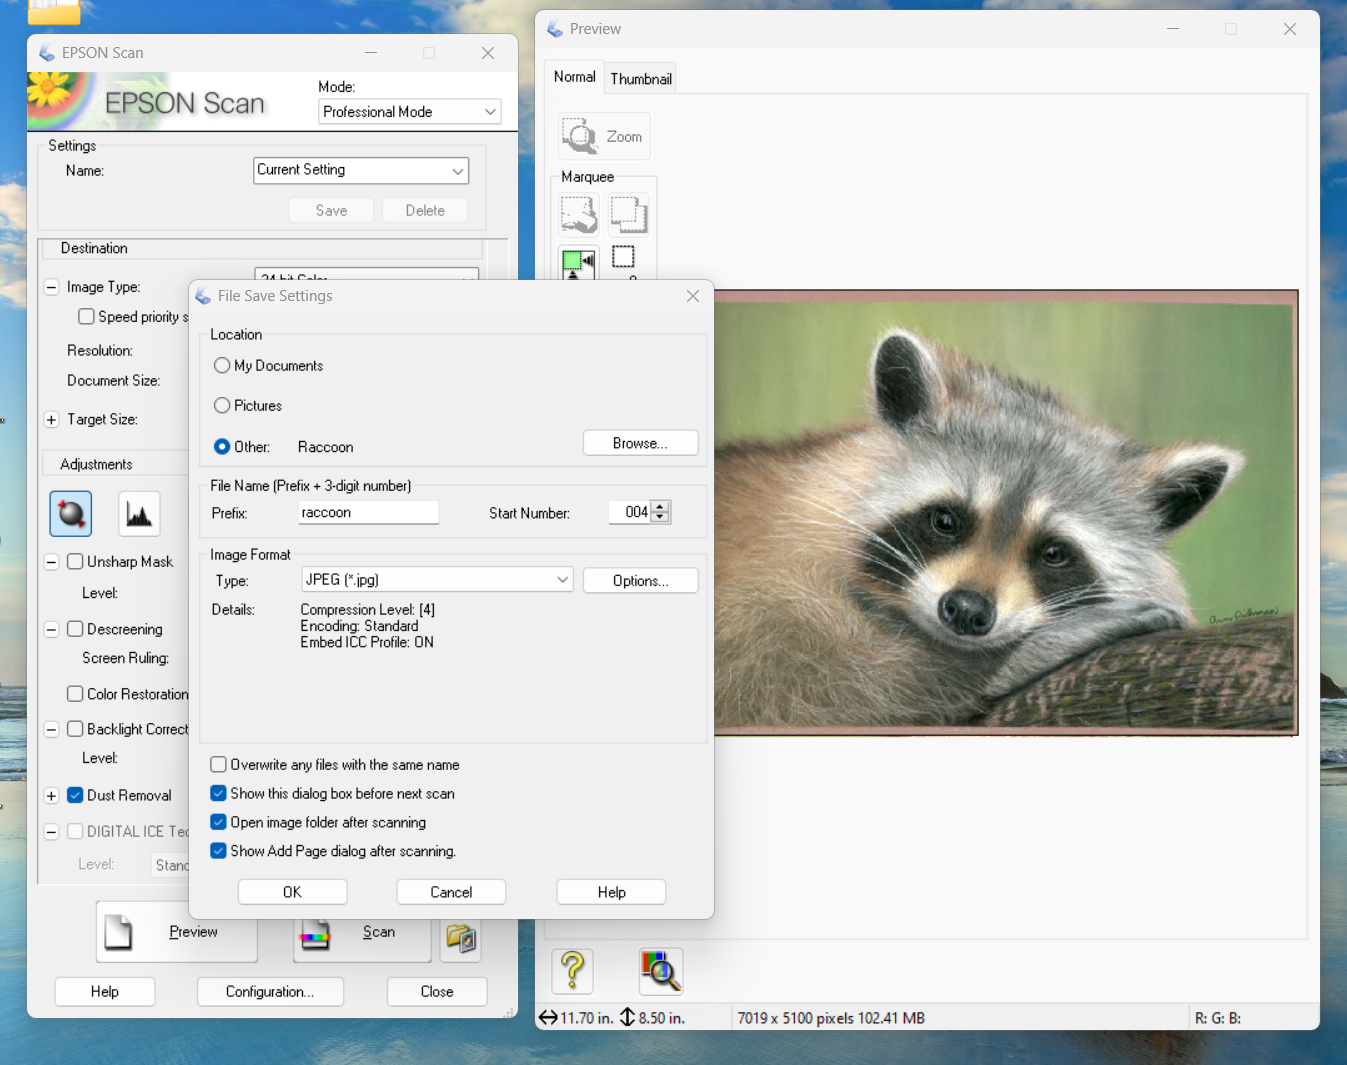
Select where you want your scanned image file to be stored. Then look at the “Image Format” options.
The interwebs say to scan your artwork as a TIFF (Tagged Image File Format), because it is an uncompressed file. TIFFs preserve the highest level of detail and allow for more extensive post-processing, if needed.
I saved my first scan as a TIFF, and it was actually too big for me to mess with in Photoshop. My computer kept freezing up, rendering my scan useless.
I save my files as JPEGs (which stands for Joint Photographic Experts Group- the people who created JPEG standards) and that works perfectly for me. The scanner does such a good job with capturing the color, I really only need to get rid of dust, dog hair or to fix a white background for my post-processing.
Watch this video to see what settings I select when I scan my artwork:
Conclusion
There’s a lot of general information out there on how to create prints out of artwork. However, I could never find specific advice on scanners and settings, so that’s why I made it a mission to write a series on how to make prints.
Save yourself some time, scan your artwork using these settings, and let me know what you think. Love to hear your thoughts.